



Embedded BLIK in checkout
Introduction
This documentation provides a step-by-step guide on how to integrate BLIK payments directly into the checkout of your store through our SDK, without redirecting the end-user to Montonio’s payment Gateway
Before you proceed, ensure you have the following:
- A backend application capable of making outbound REST requests
- Familiarity with creating orders through our system
SDK communication flow
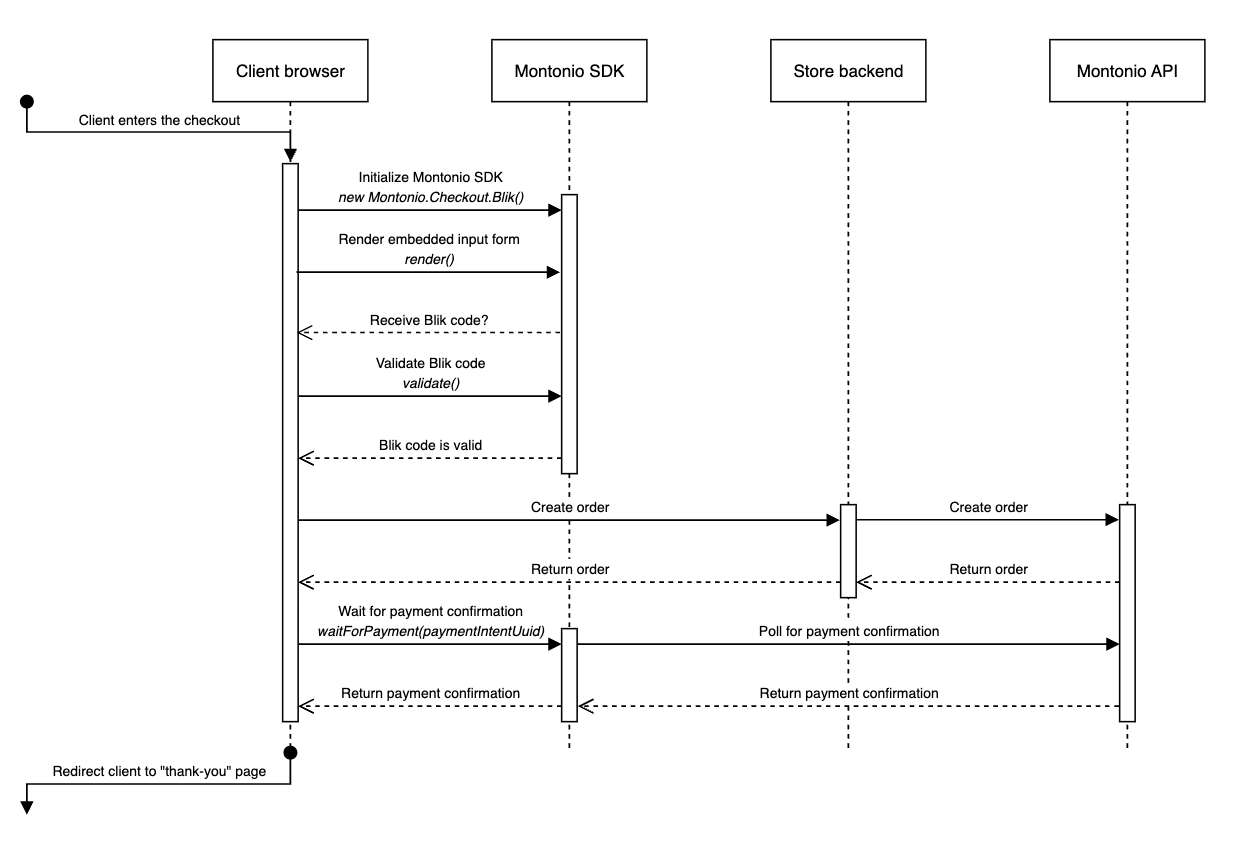
Integration Steps
1. Initializing the SDK
The SDK can be included in your HTML file with a script tag. The script tag should be included in the very bottom of the body.
NB! To enable test mode and test without using real money, please specify environment: "sandbox" as part of the Blik options object.
<script src="https://public.montonio.com/assets/montonio-js/3.x/montonio.bundle.js"></script>Here’s an example of SDK initialization:
<!DOCTYPE html><html lang="en"><head>    <meta charset="UTF-8"/>    <meta http-equiv="X-UA-Compatible" content="IE=edge"/>    <meta name="viewport" content="width=device-width, initial-scale=1.0"/>    <title>Montonio SDK</title></head><body><form id="my-checkout" novalidate>    <div id="montonio-blik-form"></div>    <button type="submit">Submit</button></form>
<script>    window.onMontonioLoaded = function () {        window.embeddedPayment = new MontonioLegacy.Checkout.Blik({            locale: "en", // the language to display the payment input fields for your customer ('en', 'pl')            environment: "production", // Set this to "sandbox" to use the Montonio Test environment            targetElement: document.getElementById("montonio-blik-form"),        });
        window.embeddedPayment.render();    }</script><!-- Don't forget to include the script tag --><script src="https://public.montonio.com/assets/montonio-js/3.x/montonio.bundle.js"></script></body></html>
2. Creating an Order
Once the SDK is initialized, a UI element displaying the BLIK code input field will appear inside the defined targetElement, along with a hidden input field named montonio_blik_code.
When the customer enters the BLIK code into the visible input field, the value is automatically propagated to the hidden input.
To create an order, retrieve the BLIK code from the hidden input field once the customer clicks the submit button. The order creation process follows the same steps as outlined in our general documentation.
Important: Be sure to include the blikCode in the methodOptions object of the order body.
import jwt from 'jsonwebtoken';import axios from 'axios';
/** * Note: Please make sure to make these calls from your server, * and not from the client. This is to prevent your secret key * from being exposed to the public. */
// 1. Gather the checkout dataconst payload = {   ...orderPayload,   method: 'blik',   methodOptions: {      blikCode: '123456'   },}
// 2. Generate the tokenconst token = jwt.sign(    payload,    'MY_SECRET_KEY',    { algorithm: 'HS256', expiresIn: '10m' });
axios.post('https://stargate.montonio.com/api/orders', {    data: token}).then(response => {    const { data } = response;    // Retrieve the paymentIntentUuid from the response payload and store it for later use    // NOTE that the paymentUrl is not included in the response data as no redirection is needed for collecting payment information
    console.log(data);    // {    //   uuid: '9ad752c0-be0f-4e5b-b4d8-9fd76b235f9e',    //   paymentStatus: 'PENDING',    //   ...    //   paymentIntents: [    //     {    //       uuid: '79be400f-340c-4151-9aae-d8c1308f3716',    //       paymentMethodType: 'blik',    //       flow: 'embedded',    //       currency: 'PLN',    //       status: 'PENDING',    //       ...    //     }    //   ],    //   ...    // },
    // 3. Retrieve the paymentIntentUuid for later use    const paymentIntentUuid = data.paymentIntents[0].uuid;}).catch(error => {  // 4. Handle errors  // 4.1 If the BLIK code is already used, expired, or another issue occurs, the response is immediate, and the client must try again.});
If the BLIK code is already used, expired, or another issue occurs, the response is immediate, and the client must try again.
{ "statusCode": 400, "message": "ER_WRONG_TICKET", "error": "Bad Request"}Possible Error Codes Returned When the Payment Method is BLIK and the blikCode is Provided
| Error Code | Description |
|---|---|
| BLIK_ER_WRONG_TICKET | Incorrect BLIK code was entered. Try again. |
| BLIK_ER_TIC_EXPIRED | Incorrect BLIK code was entered. Try again. |
| BLIK_ER_TIC_STS | Incorrect BLIK code was entered. Try again. |
| BLIK_ER_TIC_USED | Incorrect BLIK code was entered. Try again. |
| BLIK_INSUFFICIENT_FUNDS | Check the reason in the banking application and try again. |
| BLIK_LIMIT_EXCEEDED | Check the reason in the banking application and try again. |
| BLIK_ER_BAD_PIN | Check the reason in the banking application and try again. |
| BLIK_USER_DECLINED | Payment rejected in a banking application. Try again. |
| BLIK_USER_TIMEOUT | Payment failed - not confirmed on time in the banking application. Try again. |
| BLIK_TIMEOUT | Payment failed - not confirmed on time in the banking application. Try again. |
| BLIK_AM_TIMEOUT | Payment failed - not confirmed on time in the banking application. Try again. |
| BLIK_ER_DATAAMT_HUGE | Payment amount too high. |
| BLIK_ALIAS_DECLINED | Payment requires BLIK code. |
| BLIK_ALIAS_NOT_FOUND | Payment requires BLIK code. |
| BLIK_GENERAL_ERROR | Payment failed. Try again. |
| BLIK_TAS_DECLINED | Payment failed. Try again. |
| BLIK_SYSTEM_ERROR | Payment failed. Try again. |
| BLIK_ISSUER_DECLINED | Payment failed. Try again. |
3. Showing the payment confirmation modal
Once the order is created, you need to display the payment confirmation modal, which guides the client to confirm their payment in their banking app. You can do this using: window.embeddedPayment.showModal();
4. Validating the payment
After creating the order and displaying the payment instructions modal, the final step is to validate the payment. This can be done using the SDK method: waitForPayment(paymentIntentUuid). The paymentIntentUuid must be obtained from the response of the order creation endpoint.
5. Example
Here’s now a full example integrating the SDK on the frontend side:
<!DOCTYPE html><html lang="en"><head>    <meta charset="UTF-8"/>    <meta http-equiv="X-UA-Compatible" content="IE=edge"/>    <meta name="viewport" content="width=device-width, initial-scale=1.0"/>    <title>Montonio Legacy SDK</title></head><body><form id="my-checkout" novalidate>    <div id="montonio-blik-form"></div>    <button type="submit">Submit</button></form>
<script>    // 1. Initialize the SDK with the required parameters    window.onMontonioLoaded = function () {        window.embeddedPayment = new MontonioLegacy.Checkout.Blik({            environment: "production", // Set this to "sandbox" to use the Montonio Test environment            locale: "en", // the language to display the payment input fields for your customer ('en', 'pl')            targetElement: document.getElementById("montonio-blik-form"),        });
        window.embeddedPayment.render();    }
    var form = document.getElementById('my-checkout');    form.addEventListener("submit", (e) => {        e.preventDefault();
        // 2. Show the modal        window.embeddedPayment.showModal();
        // 3. Validate the input        window.embeddedPayment            .validate()            .then(function (isValid) {                if (!isValid) {                    // If validation fails, prevent form submission                    e.preventDefault();                    window.embeddedPayment.reset();                    window.embeddedPayment.closeModal();                }
                // 4. Create a new order from your backend                // 4.a. Don't forget to get the paymentIntentUuid from the created order as this is needed to confirm the payment                var paymentIntentUuid = 'replace-with-your-payment-intent-uuid';
                // 5. Confirm the payment once the order is created using the SDK method waitForPayment()                window.embeddedPayment.waitForPayment(paymentIntentUuid)                    .then(response => {                        console.log(response);                        // {                        //   "merchantReturnUrl": "https://my-store.com/orders/27731773/thank_you?order-token=eyJhbGciOiJIUzI1NiIsInR5cCI6IkpXVCJ9.eyJ1dWlkIjoidGhlLW1vbnRvbmlvLW9yZGVyLXV1aWQiLCJhY2Nlc3NLZXkiOiJNWV9BQ0NFU1NfS0VZIiwibWVyY2hhbnRSZWZlcmVuY2UiOiJNWS1PUkRFUi1JRC0xMjMiLCJtZXJjaGFudFJlZmVyZW5jZURpc3BsYXkiOiJNWS1PUkRFUi1JRC0xMjMiLCJwYXltZW50U3RhdHVzIjoiUEFJRCIsImdyYW5kVG90YWwiOjk5Ljk5LCJjdXJyZW5jeSI6IkVVUiIsIm1lcmNoYW50X3JlZmVyZW5jZSI6Ik1ZLU9SREVSLUlELTEyMyIsIm1lcmNoYW50X3JlZmVyZW5jZV9kaXNwbGF5IjoiTVktT1JERVItSUQtMTIzIiwicGF5bWVudF9zdGF0dXMiOiJQQUlEIn0.X6Ym70AA1bYIsKyNc1NL4NpznKXCrGX5xacqc1ovtuE"                        // }
                        // Redirect the user to the merchant's thank you or order confirmation page                        window.location.replace(response.merchantReturnUrl);                    })                    .catch(error => {                        // Handle errors                    });            })            .catch(function () {                // Handle validation errors (e.g., timeout)                e.preventDefault();            });    });</script><!-- Don't forget to include the script tag --><script src="https://public.montonio.com/assets/montonio-js/3.x/montonio.bundle.js"></script></body></html>
6. Test codes
You can use the following test codes to test the BLIK payment flow in sandbox:
| Test Code | Description |
|---|---|
| 777 123 | ✅ Successful payment |
| 555 555 | ❌ Incorrect BLIK code |
SDK methods
1. Initializing a new instance of the Blik class
The fields marked with an asterisk are required.
| Key | Type | Description |
|---|---|---|
| environment* | string | Use sandbox, if you are testing using the Montonio Sandbox. Available values are production and sandbox. |
| targetElement* | HTMLElement | HTML element where you want to display the embedded BLIK field. |
| locale | string | The preferred language of the payment gateway. Defaults to pl. Available values are en and pl. |
2. render
This method displays the BLIK payment input field within the specified target element. It does not accept any input parameters and does not return any output.
3. validate
This method validates the entered BLIK code. It returns a Promise<boolean>, resolving with true if the input is valid, or false if invalid. The promise is rejected if the validation process times out (5-second timeout).
4. showModal
This method opens a modal displaying instructions for the customer. It does not accept any input parameters and does not return any output.
5. closeModal
This method closes the currently open modal. It does not accept any input parameters and does not return any output.
6. reset
This method clears the BLIK input field. It does not accept any input parameters and does not return any output.
7. waitForPayment
This method waits for payment confirmation and returns a Promise<object>, resolving with an object containing the merchantReturnUrl upon success. The promise is rejected if the payment times out (2-minute timeout).
The fields marked with an asterisk are required.
| Parameter | Type | Description |
|---|---|---|
| paymentIntentUuid* | string | The paymentIntentUuid can be retrieved from the created order as shown in the code example above. |
8. setLocale
This method allows you to change the locale of the input field after it has been rendered.
The fields marked with an asterisk are required.
| Parameter | Type | Description |
|---|---|---|
| locale* | string | The new locale (e.g., ‘en’, ‘pl’) |